|
Getting your Trinity Audio player ready...
|
When it comes to lead generation for business-to-business (B2B) companies, LinkedIn is the undisputed king. According to a Hubspot study, LinkedIn delivers the highest visitor-to-lead conversion rate at 2.74% (three times higher than Facebook and Twitter).
But did you know that a LinkedIn product page is an excellent tool for generating leads?
Every day, millions of buyers search for products on LinkedIn. LinkedIn has evolved into the most trusted marketplace for B2B products by connecting products to the world’s largest professional network.
This guide will walk you through everything you want to know about LinkedIn product pages, from what they are to how you can add a product page on LinkedIn and use it to grow your sales.
Related article: Why LinkedIn Is Perfect for B2B Marketing
What Are LinkedIn Product Pages
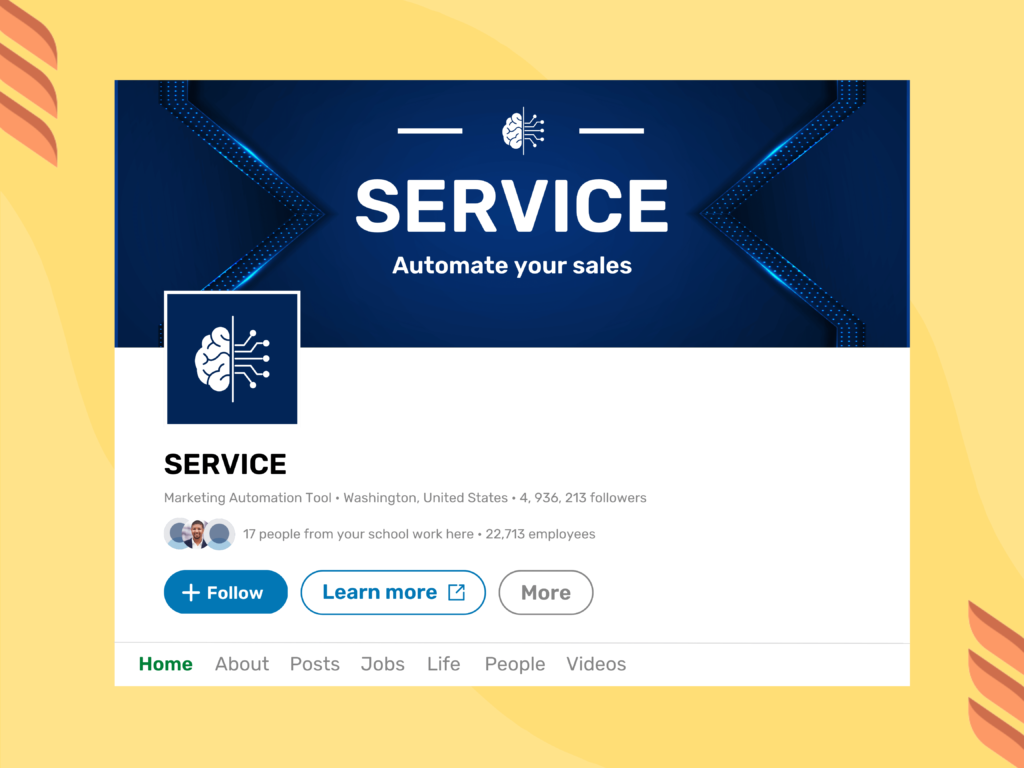
As the name suggests, a product page allows businesses to showcase their products on LinkedIn. It integrates with your LinkedIn business page, and you can access it through the “Products” tab.
A product page lets you list your products and add a description, media, customer ratings, and reviews. Although LinkedIn product pages don’t involve payment processing, you can link potential buyers to your e-commerce website.
What’s more, there’s a “featured customers” section on these pages where LinkedIn highlights people who use your products. Besides, people in your network can leave feedback on your products through product recommendations. These publicly-visible recommendations and customer information build transparency and trust, helping people make confident purchase decisions and boosting your sales.
What industries can set up product pages on LinkedIn?
- B2B software
- Computer hardware
- Financial services
- Insurance
- Education
- Healthcare
- Pharmaceutical
Overall, product pages serve as a great tool to promote your products, gain trust, and enhance brand awareness.
What to Add on LinkedIn Product Pages
Creating a product page requires you to have a few elements prepared beforehand. Let’s consider everything you’ll need to create a successful product page.
- Product name – It’s as easy as it sounds. But, it’s crucial to ensure not to make a mistake here since you’ll need to request LinkedIn permission to modify the product’s name.
- Product category – LinkedIn analyzes your company page and pre-populates the category options. This means you’ll have the options to choose from the suggested categories instead of mentioning your own.
- Product logo – It’d be best if you could prepare a specialized logo for your product. But if you don’t have one, you could use your company’s logo as an alternative.
- Custom call-to-action (CTA) – You’ll be given 6 LinkedIn CTA options to choose from: Download now, Get started, Request demo, Try now, Contact us, Learn more.
- CTA URL and website URL– The former is the URL you’ll be pasting against your CTA, while the latter could be your website’s home page.
- Product users – This is where you add the target audience for your products. Add up to 10 job functions or mention if your product is aimed at everyone.
- Existing customers – Feature customers already using your product. This is a great way to secure loyalty from existing customers and build trust in the prospects.
- Product description – Tell your target audience how your product can solve their problems. Make sure you get your point across clearly and concisely while staying under the 500-character limit.
- Visual assets – These involve photo and video content of your product. Be sure to upload a mix of high-quality photos and videos as customers interact better with visual content.

How to Make LinkedIn Product Pages
So, you’re ready to create a doorway to high-quality Leads? But how do you add a product page on LinkedIn. Let’s get started.
Step 1: Add a New Product
To begin, go to the super admin view of your business page. Click on the Products tab and then select Add product. Type in the name of your product and then click on the Save button.
After saving your product name, you’ll be directed to a new page. Here, could edit/add information by clicking on the pencil icons next to any section you’d like to modify.
Step 2: Edit Your Header
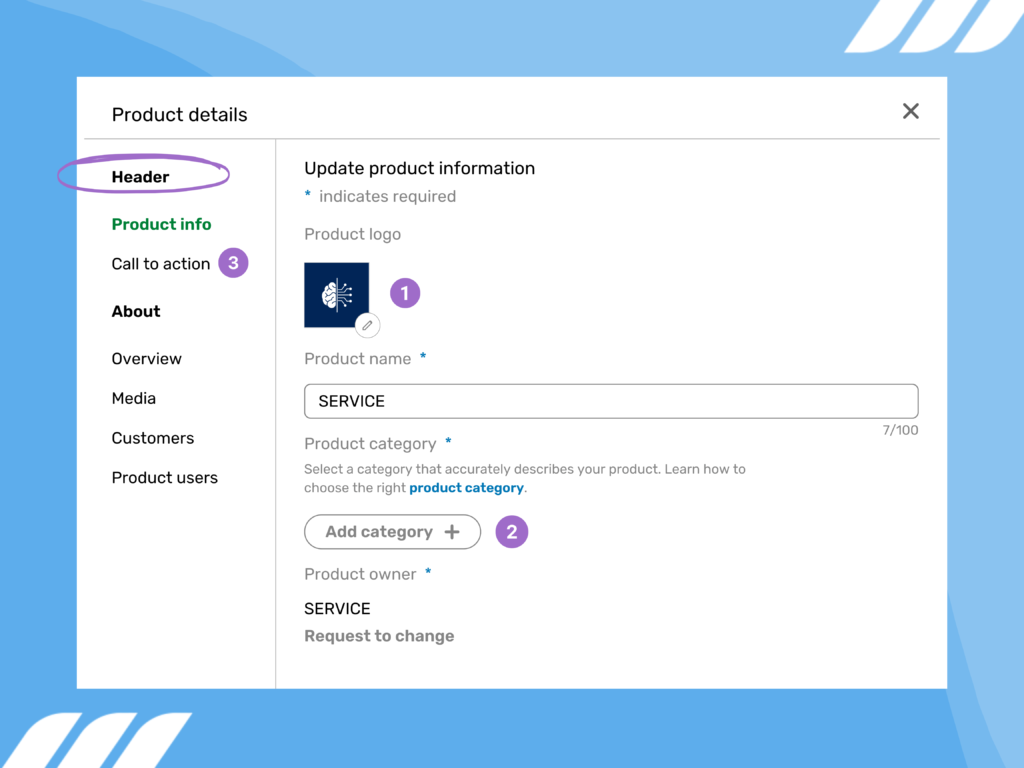

The first option in the product information would be the Product logo mentioned under the Header. Select the pencil icon to add your product’s logo. The logo should be a 1:1 square image.
Next, select Add category and type in keywords that best align with your product’s intent. LinkedIn will then suggest categories based on market research data. Once you choose the appropriate category, click save.
The second element of your header would be a CTA. Once you click the Call to action tab, you’ll have the 6 options mentioned above to choose from. Once you select your CTA, add a corresponding URL to take people to a landing/product page.
LinkedIn product page also gives you the option to capture leads. Check Collect leads and add your privacy policy link in the given field if interested.
Step 3: Provide an Overview
Under the About title, click Overview. This is where you’ll enter the Product description and Product website URL.
An effective product description starts with knowing your target audience. Then, highlight how your product would solve users’ problems instead of boasting features and specs. You could pack an emotional punch by telling a story during this process.
Step 4: Add Product Media
Now, select the Media tab, followed by clicking Add media.
You can add product demos, tutorials, trailers, or video testimonials to make your product stand out. Also, you could add Vimeo and YouTube embeds or upload local images and videos.
Step 5: Attach Existing Customers
Showing organizations currently using your product means adding social proof for your business.
To mention customers, go to the Customers tab and type in the name of the organizations you want to mention. However, as directed by LinkedIn itself, you must obtain consent from organizations beforehand to publicly identify them as your customers.
Step 6: Suggest the Types of Product Users
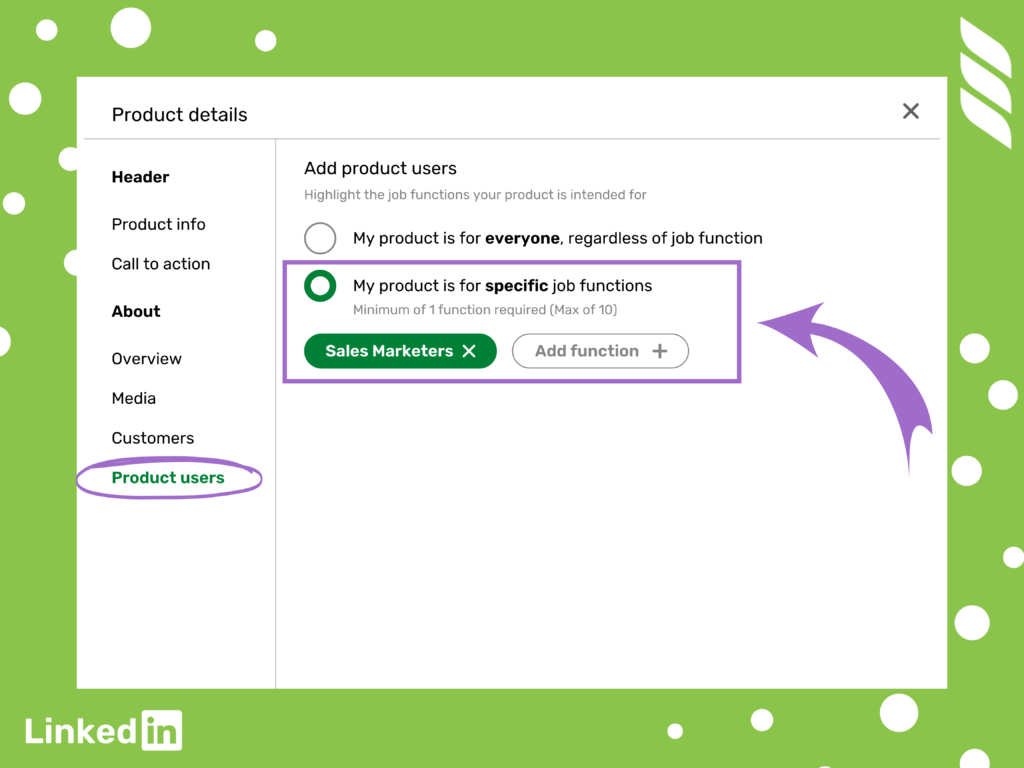

LinkedIn provides you the opportunity to specify product users to ensure that your product reaches the right audience.
Click on the Product users tab, and you’d get two options to choose from:
- My product is for everyone, regardless of job function – Select this option if you don’t want to restrict viewership on your product.
- My product is for a specific job function – If you choose this option, you could specify up to 10 job functions, each by clicking Add function.
Option 2 is generally recommended as it is more effective at generating relevant leads.
Step 7: Submit Your LinkedIn Company Product Page for Review
Once you complete all the steps, click Submit for review. The review process may take up to two weeks. Once approved, you’d be able to publish your product successfully.

Why Do You Need a LinkedIn Product Page?
Here are two of the essential outcomes of creating a page for your products.
Verifiable Social Proof
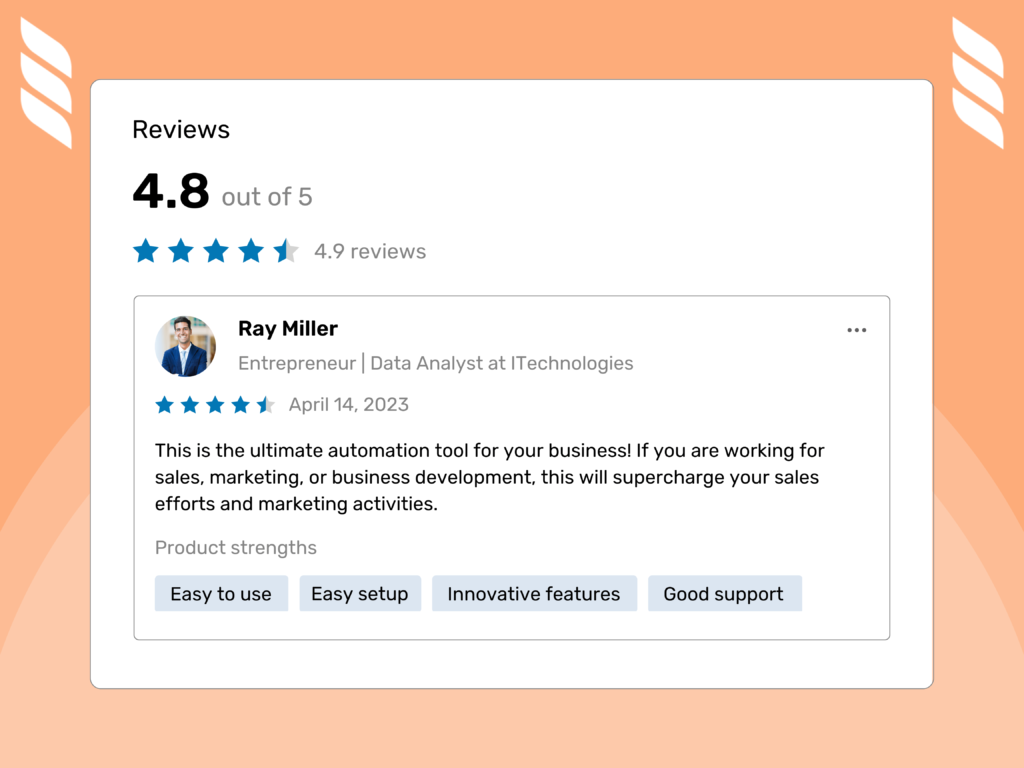

As many as 93% of customers read reviews before making their purchase decision. When users visit your product page, they could leave a review and rate your product between 1 and 5.
Besides, reviewers could indicate the key features for your products in the form of tags, such as “Easy to use,” “Innovate features,” or “Easy setup.”
These product reviews are visible to everyone, including customers’ names and profile pictures. Not only that, but LinkedIn ensures that only genuine customers are reviewing the product.
All in all, product reviews and customer information add authenticity to your product page and build trust in potential customers.
Product Awareness
Creating a product page means spotlighting your offering. In other words, product pages would give you a way to get dedicated attention to your products.
By a dedicated page for your product, you’d get a chance to highlight its features and benefits in detail. But more importantly, you’d be able to explain how this product would solve the problems of potential buyers.
Moreover, diverse options such as description, media content, and customers’ recommendations would make your product pages rock solid.


LinkedIn Product Pages vs. LinkedIn Showcase Pages
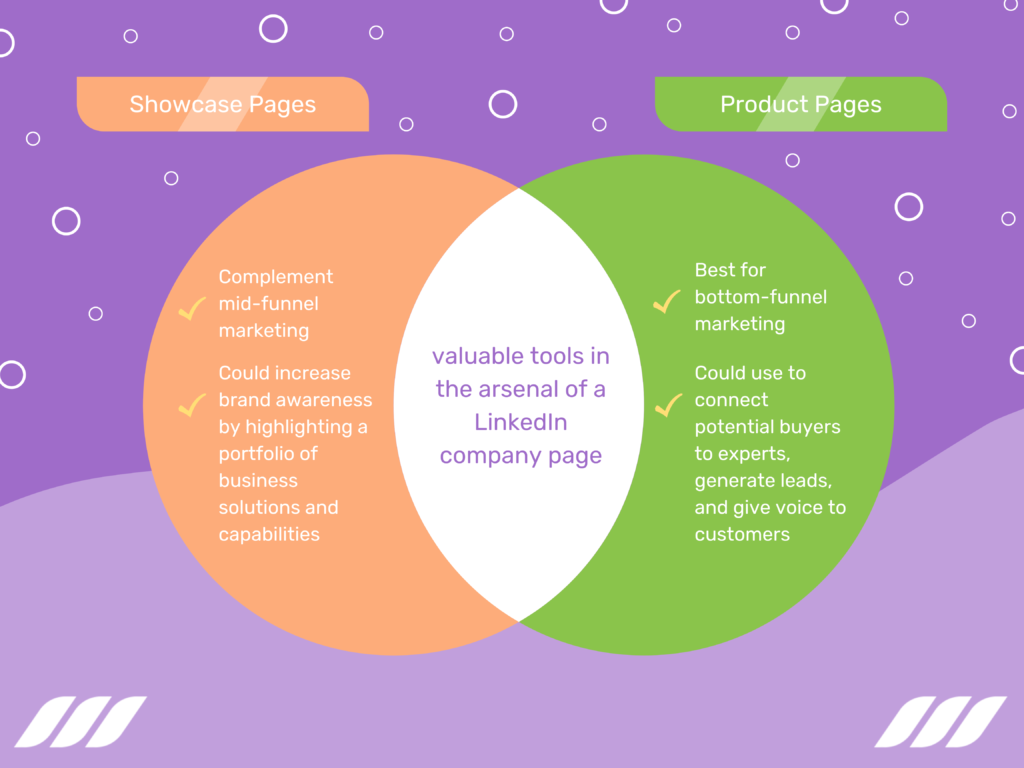
Both LinkedIn product pages and showcase pages are valuable tools in the arsenal of a LinkedIn company page.

LinkedIn showcase pages are the extension of your company that could be used to highlight:
- Sub-brand
- Business unit
- An initiative
- A particular service
Once created, showcase pages are shown under “Affiliated pages” on your LinkedIn company page.
Product pages differ from showcase pages because they focus on products solely, while showcase pages are more diverse.
If you have a varied target audience, multiple brands, or offer a range of services, go for the showcase page. In contrast, create product pages on LinkedIn to build a trusted community around your product and generate leads.
According to LinkedIn, showcase pages complement mid-funnel marketing. They could increase brand awareness by highlighting a portfolio of business solutions and capabilities.
Product pages, in contrast, are best for bottom-funnel marketing. You could use them to connect potential buyers to experts, generate leads, and give voice to customers.
LinkedIn Product Pages vs. LinkedIn Service Pages
While a LinkedIn product page provides product information, it doesn’t incorporate services. That’s where the LinkedIn service page comes into play.
Just like you spotlight your offered products on a product page, you can create a list of services on a service page. When people look up services you offer, your services would appear in the LinkedIn search bar or google search results.
Read also: How to Search LinkedIn Profiles on Google
Apart from the different intentions (products vs. services), interactivity is another way the two pages differ.
Primarily, a product page showcases products, whereby prospects are directed to an external website if they intend to buy them.
A service page, however, works on a request and proposal model. It involves prospects submitting project requests, whereas service providers submit a proposal and complete the project (in case of proposal acceptance).
While you can create up to 35 product pages, you can only list up to 10 services as a service provider. And just like product pages, service pages are receptive to customer reviews.
Conclusion
LinkedIn product pages are the best way for companies to showcase their products. It helps you list your products, adds a description, and posts images and videos to show your product range. Also, they help your customer to post ratings and reviews. LinkedIn product pages help business owners build trust and credibility, helping people make more confident decisions while buying from your business.
Showcasing your products effectively using clear images and descriptions and highlighting the features and benefits help businesses generate qualified products. LinkedIn does not allow you to sell your products directly, but when handled perfectly, these qualified leads turn into sales and generate revenue for your business. LinkedIn allows you to create up to 35 separate product pages that are sufficient for any business.
Promote your product page by sharing informative content regularly and staying active in LinkedIn groups. In addition, you can share your product pages outside of LinkedIn on other social media platforms and blogs.
You must know by now that a professionally-made LinkedIn product page is essential for any brand. With Dripify Professional LinkedIn Profile Makeover, one can create a product page that will surely create brand awareness among the potential audience. All you have to do is give a content brief to Dripify, which will build your product page that highlights your product’s features and benefits in no time.

![How to Write a Price Increase Letter [Tips, Examples, and Free Template]](https://dripify.io/wp-content/uploads/2021/12/27.png)
![How to Write an Effective Collaboration Email [+Templates]](https://dripify.io/wp-content/uploads/2023/05/13.png)


